 Preshing on Programming
Cell phone videos are notoriously shaky. It’s always been difficult to get a steady picture. So when Apple introduced a video stabilization feature on the iPhone 4S, I was really interested. I knew that the state of the art in digital video stabilization was capable of some amazing results. Finally, a few weeks back, I upgraded my phone to an iPhone 4S and took it on a two-week trip to Costa Rica.
By the end of the trip, I had shot hundreds of photos and 80 video clips – about 20 minutes of video in total. The iPhone 4S has a great camera, but I quickly learned that its built-in video stabilization feature is, well, not state of the art. It can perform some modest stabilization in cases where you attempt to hold the camera still and point it in a single direction. But other times, it doesn’t seem to help at all.
That’s OK, because with a little patience, and a free utility called Deshaker by Gunnar Thalin, you can remove the camera shake on your PC when you get home. For example, here’s some footage I shot of a coati at the top of Cerro Chato. The first part of the video shows the original, shaky iPhone 4S video – I blame the tasty Costa Rican coffee – and the second part shows the result after running it through Deshaker. While the result may not be flawless, I find it to be a significant improvement:
Deshaker is a plugin for VirtualDub, a popular video editor by Avery Lee. The Deshaker documentation contains instructions on how to use it within VirtualDub, and there are additional guides available online. However, I had a lot of videos to stabilize, and following such guides would have been very time-consuming, as each video requires several manual steps. Not to mention I had trouble convincing VirtualDub to open the .mov files saved by the iPhone.
Therefore, I decided to automate the process by writing a Python script, which you can download here. This script makes use of an assortment of free tools for Windows: ffmpeg, AviSynth, Deshaker and a few others. These tools are definitely for power users – ffmpeg even calls itself a very experimental and developer-driven project. They’re great tools, but I must admit: Every time I use them, I feel a little bit of dread. I know I’m about to lose a big chunk of my weekend googling for information, trying different combinations, experimenting with settings and working around bugs. And once I’ve finished, I usually forget everything I learned.
So this time, I decided to document the process. In this post, I’ll show you how to install the software needed to run this script yourself. I’ll also describe each step performed by the script, and explain why I chose to implement it the way I did. The script is currently customized for iPhone 4S videos, but I hope to provide enough information here so that you can adapt it to work with other video sources as well.
Required Software
You’ll need to install all of the following free software, if you haven’t already. It all works on any version of Windows (XP or higher).
Install ffmpeg
ffmpeg is an open-source, cross-platform command-line tool which knows how to encode and decode a ton of audio/video formats. We’ll use it to encode our stabilized video as .mp4. I chose MP4 as the target format because Windows, Mac and Ubuntu all seem to recognize it without too much fuss.
I installed the 32-bit Static build of version git-41a097a (April 3) from this page. The build is distributed as a 7-zip file, so you’ll need to install the 7-zip extractor to open it. Installation is a simple matter of extracting the complete contents to a directory somewhere. I extracted it to c:\util\ffmpeg.
A small warning: In the past, I’ve found that the command-line arguments of ffmpeg may change from one version to the next. Therefore, if you search for examples of ffmpeg command lines, they may not work with the version you have. Hopefully the arguments won’t change too much in future versions, so that this guide will remain intact.
Install AVISynth
AVISynth is a frameserver, designed to provide audio/video input to other tools. It’s based on a neat trick: Once you install AVISynth, Windows will believe that any file with the extension .avs is a video file. In reality, an .avs file is just a text file you write in a custom scripting language, telling AVISynth how to render the video. We’ll use AVISynth to open our .mov files, rotate them, pad and trim extra frames, resize them, and most importantly – to run Deshaker.
AVISynth comes with a regular Windows installer. I installed the 32-bit version 2.5.8 from here. The 32-bit version is required if you want to use 32-bit plugins, which we do. When you install it, pay attention to the exact installation path, because you’ll need to remember it later.
Install Quicktime
Install Quicktime from Apple. Odds are, you already have it, but in case you don’t, here’s the download link. It’s required for QTSource to work.
Install QTSource
QTSource is a plugin for AVISynth. It gives AVISynth the ability to open .mov files, but it requires you to have Quicktime installed. There are alternative ways to open .mov files in AVISynth, but I couldn’t get any of them to work reliably with the iPhone 4S videos on my computer. So QTSource it is.
I used QTSource version 0.1.4, which you can currently download from the author’s download page (direct link). Simply open the zip file and extract QTSource.dll to your AVISynth plugins folder. This is the only file needed. In my case, I extracted it to C:\Program Files (x86)\AviSynth 2.5\plugins.
Install Deshaker
As I mentioned, Deshaker is a plugin for VirtualDub – but you don’t actually need VirtualDub to use it. It turns out that AVISynth can use any plugin written for VirtualDub. I downloaded Deshaker 3.0 from the author’s page (direct link). It’s a zip file, so simply open it and extract Deshaker.vdf to the folder of your choice. I happen to have VirtualDub installed in C:\Util\VirtualDub, so I’ve extracted it to C:\Util\VirtualDub\plugins. But any folder will do.
Install MediaInfo
MediaInfo is small utility to extract metadata from video files. We’ll use it to determine the rotation of each .mov file. It’s especially important to know the rotation because of the rolling shutter, as I’ll explain later. We want the CLI (Command Line Interface) version of MediaInfo, so that Python can interact with it. I installed the 32-bit version 0.7.56 from this page. It’s distributed as a zip file – I extracted mine to C:\Util\MediaInfo.
Install Python
Of course, you need Python. I developed the script in Python 2.7, but it might work in earlier versions. I prefer installing ActiveState Python for Windows, because it comes with PythonWin, but the regular installer will work too.
How to Run It
First, copy the iPhone videos to a folder on your PC. Then save the Python script somewhere; for example, in the same folder as the videos to convert. Open the Python script in a text editor and modify the hardcoded path names to correctly reflect the installation paths on your machine:
MEDIAINFO_FOLDER = r'C:\Util\MediaInfo'
DESHAKER_FOLDER = r'C:\Util\VirtualDub\Plugins'
FFMPEG_FOLDER = r'C:\Util\ffmpeg\bin'
Next, open a command prompt, navigate to the folder containing the videos you want to convert, and run any command similar to the following. If the Python script is in a different folder, make sure to specify its full path. You can also specify the name of a single video file, or any wildcard pattern accepted by Python’s glob module, such as *.mov.
python stabilize.py *.mov
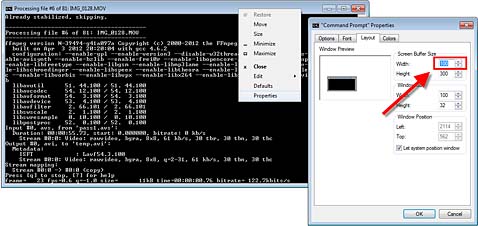
While the script is running, the Command Prompt title bar will change to reflect encoding progress. I recommend resizing the window to be 100 columns wide so that ffmpeg’s progress messages fit completely on one line. If they extend to two lines, your Command Prompt window will fill up with spam. To change the width, right-click on the window and choose Properties.
The script saves the processed video back to the same folder as the .mov files, with the extension _stabilized.mp4. During the conversion process, it also creates a bunch of temporary files in the current working directory, which are deleted afterwards.
Finally, be warned that the conversion process is very slow. On my underpowered Core 2 Duo E6300, every minute of video takes about an hour to process.
What it Does
Here are all the steps performed by the script.
Determining the Video Rotation
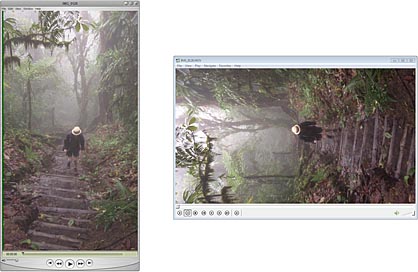
The iPhone 4S knows which way you are holding the phone while you shoot the video, but it handles it in a funny way: It always records the video from the point of view of a non-rotated phone, and stores some metadata in the file to remember which way the phone was held. On Windows, the QuickTime video player recognizes this metadata, and will play the video back with the correct rotation; but Media Player Classic, an alternative player installed by the K-Lite Codec Pack, does not.
By the way, I recommend against filming vertical videos. They’re terrible for sharing online. In any case, you can view the rotation metadata by running MediaInfo on the video:
c:\util\mediainfo\mediainfo img_0128.mov
If the phone was rotated during recording, it will be listed in the output as either 90, 180 or 270.
...
Bit rate                                 : 24.0 Mbps
Width                                    : 1 920 pixels
Height                                   : 1 080 pixels
Display aspect ratio                     : 16:9
[[[Rotation                                 : 90°         ]]]
Frame rate mode                          : Variable
Frame rate                               : 29.904 fps
...
The Python script automatically runs MediaInfo and extracts the rotation info from the output.
Generate a Log File Containing Camera Movement Information
The Deshaker plugin works in two passes. In the first pass, it determines camera movement information on a frame-by-frame basis. On the second pass, it corrects each video frame to produce a smoother video. Normally, you would perform both passes entirely within VirtualDub, but in our case, the Python script automates both passes using temporary AVISynth scripts.
The first pass is taken care of by pass1.avs, a temporary AVISynth script with contents similar to the following:
LoadVirtualDubPlugin("C:\Util\VirtualDub\Plugins\Deshaker.vdf", "Deshaker")
QTInput("D:\Photos\Costa Rica 2012\Videos\img_0128.mov", color=1)
TurnLeft()
Deshaker("18|1|30|4|1|0|1|0|640|480|1|1|650|650|1000|650|4|0|6|2|8|30|300|4|
D:\Photos\Costa Rica 2012\Videos\img_0128_deshaker.log|0|0|0|0|0|0|0|0|0|0|0|
0|0|1|12|12|10|5|1|1|10|10|0|0|1|0|1|0|0|10|1000|1|88|1|1|20|400|90|20|1")
LoadVirtualDubPlugin()is required to make the Deshaker plugin work.QTInput()is the function which opens the .mov file using the QTSource plugin. Thecolor=1option tells the plugin to return video frames in the RGB32 format. This is the only format which the Deshaker plugin accepts. (We could have converted the pixel format using a separate AVISynth function,ConvertToRGB32, but thecolor=1option is faster.)- Since
QTInput()uses QuickTime, which knows about the rotation metadata mentioned above, it will automatically rotate the video correctly according to the way the phone was held. We don’t actually want this; we want to process the video from the non-rotated camera’s point of view, for reasons explained below. That’s the what theTurnLeft()call is for in this case. The exact function may differ depending on the rotation. - Finally, we pass each video frame to
Deshaker(), which will determine the camera movement information for each frame. In this case, the information gets saved to the temporary log fileD:\Photos\Costa Rica 2012\Videos\img_0128_deshaker.log.
To actually run the video through the AVISynth script, and generate a log file, we use the following command line. I won’t describe what all the options do, but you can always look them up in the ffmpeg documentation.
C:\Util\ffmpeg\bin\ffmpeg.exe -y -i pass1.avs -vcodec copy temp.avi
In the AVISynth script, you’ll notice a huge option string passed to Deshaker(). According to the author, Deshaker accepts its arguments as a long string because there is a limit to the number of separate arguments that can be passed from VirtualDub. There is a complete reference in the documentation. I’ve customized a few options in particular, which are highlighted below. Personally, I prefer these values over the defaults; your mileage may vary.
"18|[[[1]]]|30|4|1|0|1|0|640|480|[[[1|1]]]|[[[650|650|1000|650]]]|4|[[[0]]]|[[[6]]]|2|8|30|300|4|
D:\Photos\Costa Rica 2012\Videos\img_0128_deshaker.log|0|0|0|0|0|0|0|0|0|0|0|
0|0|1|[[[12|12|10|5]]]|[[[1|1]]]|[[[10|10]]]|0|0|[[[1]]]|0|1|0|0|10|1000|1|88|1|1|20|[[[400]]]|[[[90]]]|20|1"
| Option # | Description | Value |
|---|---|---|
| 2 | Pass number | Set to 1 on the first pass, 2 on the second. |
| 11 - 12 | Scale and Use pixels | 1|1 tells Deshaker to downsize each video frame to half-resolution and use every pixel to perform motion estimation. We could also tell it to work with full-resolution video frames, but it would run even more slowly. |
| 13 - 16 | Motion smoothness | 650|650|1000|650 The amount of smoothing to perform along each of four axes of motion (horizontal, vertical, rotate and zoom). I’ve lowered horizontal and vertical from their defaults of 1000. If you leave these values too high, and your video contains a lot of sudden pans, Deshaker tends to zoom the camera too much in the processed video. |
| 18 | Video output | 0 tells Deshaker to output an empty 8×8-pixel video during the first pass. This empty video is written to temp.avi in the ffmpeg command line above, and deleted later by the Python script. If we left this option at its default, 1, Deshaker would output video frames with motion vectors superimposed, as seen below. This is what you normally see during the first pass when running Deshaker from VirtualDub.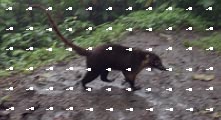 |
| 19 | Edge compensation | 6 tells Deshaker to zoom the video frame as much as necessary to avoid blank space on the side of the frame. Option 63 tells it to dial it back a little, but overall, I prefer to minimize the amount of blank space. |
| 40 - 43 | Max. correction limits | 12|12|10|5 sets the maximum correction limits. I increased the rotation threshold, but lowered the other values. You don’t want to set these too low, because larger shakes will remain in the processed video. |
| 44 - 45 | Fill in borders | 1|1 Use previous and future frames to fill in borders. |
| 46 - 47 | Previous and Future frames | 10|10 Allow Deshaker to use the previous 10 and future 10 frames to fill in borders. I lowered these from the default value of 30, as it runs much faster without making a noticeable quality difference. |
| 50 | Camera has a rolling shutter | 1 Yes. The iPhone has a rolling shutter which has a tendency to distort the video when the camera is panned rapidly. An example is shown in the video below. Deshaker is able to reduce the distortion effect when this option is enabled, but only if the video is oriented from the point of view of a non-rotated phone. |
| 62 | Adaptive zoom smoothness | 400 I lowered this setting from the default of 5000 to allow Deshaker’s adaptive zoom to kick in and wear off more quickly. |
| 63 | Adaptive zoom amount | By setting this to 90, we allow a maximum 10% of the borders to appear during adaptive zoom. |
Correct Each Frame and Encode a New Video
The second pass in the process of running Deshaker is taken care of by pass2.avs, a temporary AVISynth script with contents similar to the following:
LoadVirtualDubPlugin("C:\Util\VirtualDub\Plugins\Deshaker.vdf", "Deshaker")
QTInput("D:\Photos\Costa Rica 2012\Videos\img_0128.mov", color=1)
clip = TurnLeft()
clip + BlankClip(clip, 10)
Deshaker("18|2|30|4|1|0|1|0|640|480|1|1|650|650|1000|650|4|0|6|2|8|30|300|4|
D:\Photos\Costa Rica 2012\Videos\img_0128_deshaker.log|0|0|0|0|0|0|0|0|0|0|0|
0|0|1|12|12|10|5|1|1|10|10|0|0|1|0|1|0|0|10|1000|1|88|1|1|20|400|90|20|1")
Trim(0, FrameCount - 3)
Width > Height ? Lanczos4Resize(960, 540) : Lanczos4Resize(540, 960)
TurnRight()
The Deshaker options string is identical to the previous one, except the second option changes to 2 to indicate this is the second pass. This time, Deshaker will output the corrected video frames, but we need to perform a few extra steps in the script:
- Deshaker outputs 10 bogus frames at the beginning of the clip – the same number we specified for options #46 - 47 (Previous and Future frames) in the options string. We’ll trim those later, from the ffmpeg command line. It also eats the final 10 frames. To avoid losing real frames, we append 10 blank frames at the end of the input video, using the expression
clip + BlankClip(clip, 10). - For some reason, Deshaker also adds two garbage frames at the end of the video. Those are removed using the
Trim()function. - I like to resize the video down to 960x540 using
Lanczos4Resize(). This makes the file size smaller and the processing time shorter, while still retaining a lot of detail. Besides, 1920x1080 is way too big and slow to view on the average desktop. - Finally, we rotate the video back to its correct orientation.
We run the video through the above AVISynth script using the following unwieldy command line:
c:\util\ffmpeg\ffmpeg.exe -y -i pass2.avs -itsoffset 0.33333 -i img_0128.mov -map 0 -map 1:1
-pix_fmt yuv420p -vcodec libx264 -preset veryslow -crf 15 -x264opts frameref=15:fast_pskip=0
-acodec copy -ss 0.33333 img_0128_inprogress.mp4
The idea behind this command line is to grab the processed video from AVISynth script, grab the audio from the original iPhone 4S video, splice them together while compensating for audio drift, and save the result as img_0128_inprogress.mp4 using the best compression. I chose to let ffmpeg handle the audio because when I tried to let AVISynth handle it (by adding audio=1 to QTInput), ffmpeg reported errors. You can look up each command-line argument in the ffmpeg documentation, but here’s a detailed breakdown:
-i pass2.avsand-i img_0128.movdefine the two input files for ffmpeg.-map 0 -map 1:1tells ffmpeg to take the video from the first input file and the audio from the second input file.-itsoffset 0.33333tells ffmpeg to delay the audio signal ofimg_0128.movso that it matches the video frames coming from thepass2.avs. Remember, Deshaker added 10 bogus frames to the beginning of the video, and since iPhone videos are 30 frames/sec, 10 frames equals 0.33333 seconds.-ss 0.33333tells it to discard the first 10 frames when writing the output, while still keeping the audio correctly aligned. This is the only way to correctly discard the bogus video frames. (I tried using the Trim command within AVISynth instead, but it doesn’t work: It only ends up trimming the input, and Deshaker still adds bogus frames at the start.)-pix_fmt yuv420pconverts the video frames to a color space compatible with H.264. The command line will still work without this option, but you’ll get a warning if you remove it.-vcodec libx264 -preset veryslow -crf 15 -x264opts frameref=15:fast_pskip=0tells ffmpeg to use the highest quality H.264 compression. I basically just copied these settings from here. I didn’t bother with 2-pass H.264 compression because I didn’t want to run Deshaker twice. These settings give excellent video quality, though the resulting bitrate tends to be very high and could probably be optimized. If anyone wants to share some tips here, I’m all ears.-acodec copytells ffmpeg to copy the compressed AAC audio data directly from the input to the output file without converting it. This way, we save processing time without degrading audio quality.
And that’s it! I’m not saying this is the best approach, but it worked well for me. If I was willing to spend more time on it, I would investigate using MVTools2 to estimate the camera motion and generate the Deshaker log file in the first pass, as it seems to run faster based on past experience.
If you have any success using this script to remove camera shake from your own videos, I’d be interested to hear about it!