 Preshing on Programming
Last week, I posted some obfuscated Python which generates Penrose tiling. Today, I’ll explain the basic algorithm behind that Python script, and share the non-obfuscated version.
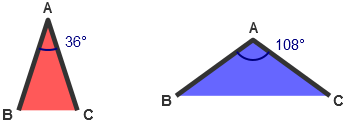
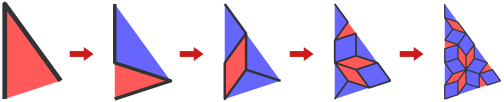
The algorithm manipulates a list of red and blue isosceles triangles. Each red triangle has a 36° angle at its apex, while each blue triangle has a 108° angle.
In Python, we can represent such triangles as tuples of the form (color, A, B, C). For the first element, color, a value of 0 indicates a red triangle, while 1 indicates blue. The rest of the tuple gives the co-ordinates of the A, B and C vertices, expressed as complex numbers. Complex numbers work well here since they can represent any point on the 2D plane – the real component gives the x co-ordinate, while the imaginary component gives the y co-ordinate.
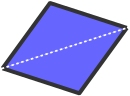
As you can see, we draw an outline along the sides of the triangle, but not along the base. This allows each triangle to connect with another triangle of the same color, forming the rhombus-shaped tiles that are visible in the final Penrose tiling.
Now here’s the fun part. Given a list of such triangles, we can subdivide each one to generate another triangle list. A red triangle is subdivided into two smaller triangles as follows:
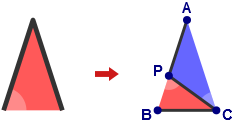
The above subdivision introduces a new vertex P, located at a point along the edge AB which satisfies the golden ratio, \(\frac{1 + \sqrt{5}}{2} \).
Similarly, each blue triangle is subdivided into three smaller triangles:
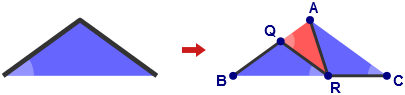
This subdivision introduces two new vertices: Q along the edge BA, and R along the edge BC, at points which also satisfy the golden ratio. As well, two of the resulting triangles are mirrored – I’ve drawn a highlight in the corner of each triangle to help identify which ones are mirrored and which are not.
All of the above steps can be performed using just a few lines of Python. This function accepts a list of triangles represented as tuples, subdivides each one, and returns the new triangle list:
goldenRatio = (1 + math.sqrt(5)) / 2

def subdivide(triangles):
    result = []
    for color, A, B, C in triangles:
        if color == 0:
            # Subdivide red triangle
            P = A + (B - A) / goldenRatio
            result += [(0, C, P, B), (1, P, C, A)]
        else:
            # Subdivide blue triangle
            Q = B + (A - B) / goldenRatio
            R = B + (C - B) / goldenRatio
            result += [(1, R, C, A), (1, Q, R, B), (0, R, Q, A)]
    return result
And here’s some code to actually draw the triangle list. It uses pycairo, a Python wrapper around the excellent cairo drawing library.
# Draw red triangles
for color, A, B, C in triangles:
    if color == 0:
        cr.move_to(A.real, A.imag)
        cr.line_to(B.real, B.imag)
        cr.line_to(C.real, C.imag)
        cr.close_path()
cr.set_source_rgb(1.0, 0.35, 0.35)
cr.fill()

# Draw blue triangles
for color, A, B, C in triangles:
    if color == 1:
        cr.move_to(A.real, A.imag)
        cr.line_to(B.real, B.imag)
        cr.line_to(C.real, C.imag)
        cr.close_path()
cr.set_source_rgb(0.4, 0.4, 1.0)
cr.fill()

# Determine line width from size of first triangle
color, A, B, C = triangles[0]
cr.set_line_width(abs(B - A) / 10.0)
cr.set_line_join(cairo.LINE_JOIN_ROUND)

# Draw outlines
for color, A, B, C in triangles:
    cr.move_to(C.real, C.imag)
    cr.line_to(A.real, A.imag)
    cr.line_to(B.real, B.imag)
cr.set_source_rgb(0.2, 0.2, 0.2)
cr.stroke()
Using all of the above code, we can, for example, start with a single red triangle, subdivide it several times, and draw the result after each subdivision. You can see the tiling pattern begin to emerge:
You can even begin the sequence using another triangle list. Here’s some code to start with a “wheel” shape consisting of 10 red triangles:
# Create wheel of red triangles around the origin
triangles = []
for i in xrange(10):
    B = cmath.rect(1, (2*i - 1) * math.pi / 10)
    C = cmath.rect(1, (2*i + 1) * math.pi / 10)
    if i % 2 == 0:
        B, C = C, B  # Make sure to mirror every second triangle
    triangles.append((0, 0j, B, C))
If we subdivide this wheel shape repeatedly, we get the following sequence of tilings. Notice that each tiling contains a lot of symmetry – both reflective and rotational symmetry around 5 different axes:
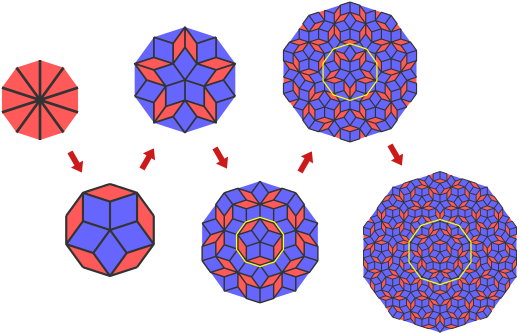
If you study either the top or bottom row of this sequence carefully, you’ll notice that for each tiling except the first, an upside-down copy appears in the tiling to the right. I’ve drawn some yellow outlines to make this more obvious. Looking at it another way: if you take any of these tilings, subdivide it twice, flip it vertically and enlarge the result, you’ve basically added another ring around the tiling. By repeating this process indefinitely, you can see how a Penrose tiling could be made to completely fill the entire plane.
Finally, here’s a (non-obfuscated) Python script which ties everything together: download penrose.py. It starts with a wheel pattern, subdivides it 10 times, and renders the enlarged, cropped result inside a 1000x1000 image.
I pieced this explanation together from various sources: mainly this page at UBC and the Wikipedia entry. Mind you, this is not the only algorithm which can generate a Penrose tiling. Another method involves projecting a 5-dimensional set of lattice points onto a 2D plane. I haven’t taken the time to fully understand that one, but it seems to open up the possibility of interesting color patterns.